Using
fresh vanilla beans can drastically improve the flavor of your dessert,
especially in creamy desserts such as crème brûlée and my vanilla bean custard. When a
recipe calls for a vanilla bean, it usually utilizes only the vanilla bean
seeds, so you will have to split the vanilla bean pod and scrape the middle to
get the seeds out. You can purchase vanilla beans from online retailers, cooking stores (such as Sur La Table, Williams-Sonoma, and Dean & Deluca) or well stocked grocery stores.
The Process:
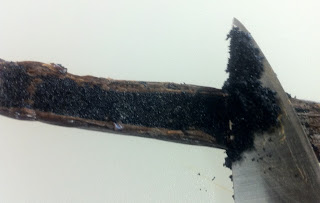
- Split the Bean: Take a sharp paring knife and poke a hole through the vanilla bean so the bean lies flat when you hold the knife horizontally (see picture above). Hold the vanilla bean in place on the side facing the dull part of your knife. Using short, sawing motions pull the paring knife across the entire vanilla bean so that it splits into two even halves.
- Scrape the seeds: Hold the dull side of your paring knife firmly against the middle of the vanilla bean half and scrape across the entire bean. If your vanilla bean half folds over at the edges, you may need to repeat this motion with the dull side of the tip of the paring knife to get the seeds underneath each fold. Repeat with the other half.
Note:
Using fresh vanilla bean pods makes the splitting and scraping process much easier. Your vanilla bean pod should be pliable and slightly sticky. When the vanilla bean is old and dry, it will crack when you try to split it and the vanilla bean seeds will get all over the place. When the vanilla bean is fresh, the pod is flexible and fairly easy to split and the seeds are moist enough to stick together when scraped.
Suggestion:
Vanilla Sugar - Since most recipes do not utilize the vanilla bean pod after the seeds have been scraped, I like to add the pods to an airtight container of granulated sugar. The longer the sugar and vanilla bean pods sit together, the more the sugar gains the aroma and flavor of vanilla. You can then use this vanilla sugar in dessert recipes or to sweeten drinks.


